
Setting up Starlink is simpler than it first appears, but it is not something you want to rush through or guess your way around. A few early decisions, especially where you place the dish and how you power it, can make the difference between a solid connection and constant frustration.
This guide walks through the setup process in a clear, practical way. No technical jargon, no shortcuts that cause problems later. Just the steps that matter, explained the way someone who has actually done it would explain them. The goal is not just to get Starlink online, but to get it working reliably from day one.
How Starlink Setup Connects to Our Work at FlyPix AI
At FlyPix AI, we build tools that help teams work with satellite, aerial, and drone imagery using AI-based geospatial analysis. Our platform is used to detect objects, monitor changes, and turn visual data into structured outputs that support real operational decisions across industries like infrastructure, agriculture, environmental monitoring, and urban planning. Because this work depends on moving and processing large image datasets, reliable internet access is not optional, it is part of the foundation.
That is why proper Starlink setup matters in practice. When Starlink is installed with attention to placement, power stability, and sky visibility, it creates the connectivity layer that allows our platform to be used without constant delays or interruptions. Once that layer is stable, teams can focus on analyzing imagery instead of waiting for uploads to finish or connections to recover. In this sense, Starlink does not replace analytical tools, but it enables them to work as intended in locations where traditional networks are limited or unavailable.
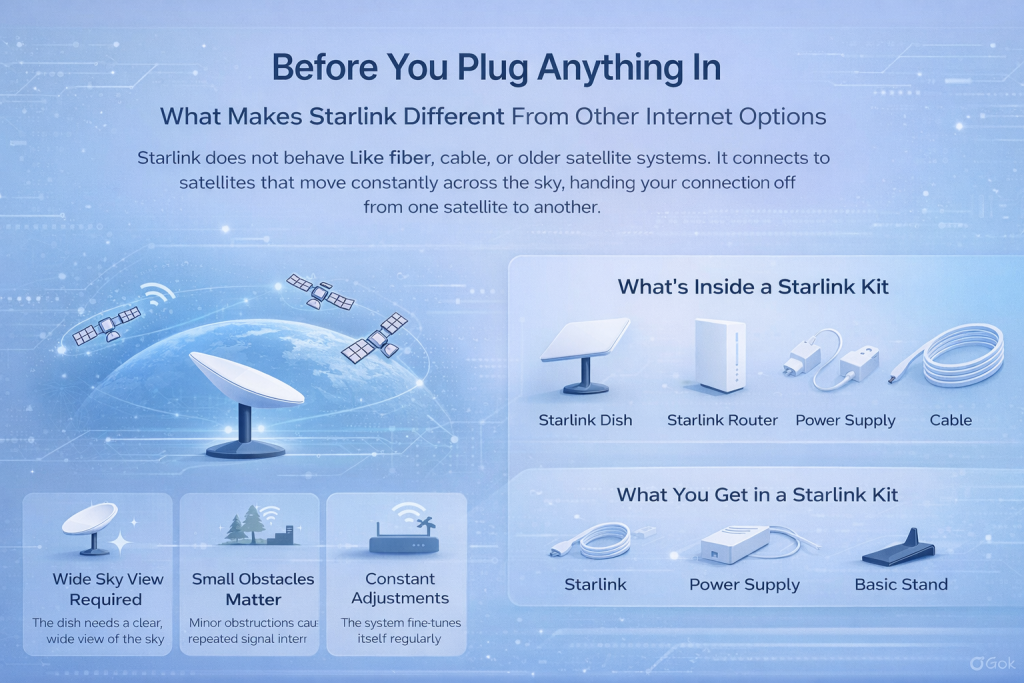
Before You Plug Anything In
What Makes Starlink Different From Other Internet Options
Starlink does not behave like fiber, cable, or older satellite systems. It connects to satellites that move constantly across the sky, handing your connection off from one satellite to another.
Because of that, three things matter more than people expect:
- The dish needs a wide view of the sky, not a narrow angle
- Small obstacles create repeated interruptions over time
- The system keeps adjusting itself during the first day
If you understand this early, the rest of the setup makes more sense.
What You Get in a Starlink Kit
The exact contents of a Starlink kit vary slightly depending on the version, but the overall structure stays the same. In most cases, the package includes the Starlink dish itself, a router or a combined all-in-one unit, the cable that connects the dish to the router, a power supply, and a basic stand or mounting solution. Before moving on to setup, it is worth taking a moment to check that every cable is properly connected and free from damage. A surprising number of setup problems turn out to be nothing more than a loose or partially seated connector..
Choosing the Location Is the Real Setup
Why Location Controls Everything That Follows
If there is one decision that affects speed, stability, and reliability more than any other, it is where the dish is placed.
A poor location leads to:
- short but frequent dropouts
- inconsistent speeds
- unstable latency
No router upgrade or reset will fully fix that later.
How Starlink Actually Uses the Sky
Starlink does not lock onto a single satellite. Instead, it works like this:
- A satellite appears overhead
- The dish connects and exchanges data
- Another satellite takes over moments later
This happens continuously. Any obstacle that blocks part of that process creates interruptions, even if the dish looks mostly unobstructed.
Obstructions Are a Spectrum, Not a Yes or No
Many people think obstructions are either present or not. In reality, they fall into levels
1. Minor obstructions
- thin branches
- roof edges
- distant poles
These cause short interruptions that repeat often.
2. Moderate obstructions
- nearby trees
- building corners
- fences close to the dish
These reduce performance in noticeable ways.
3. Major obstructions
- dense tree cover
- walls or structures nearby
These often prevent stable service entirely.
Each level adds up over time, even if the connection seems usable at first.
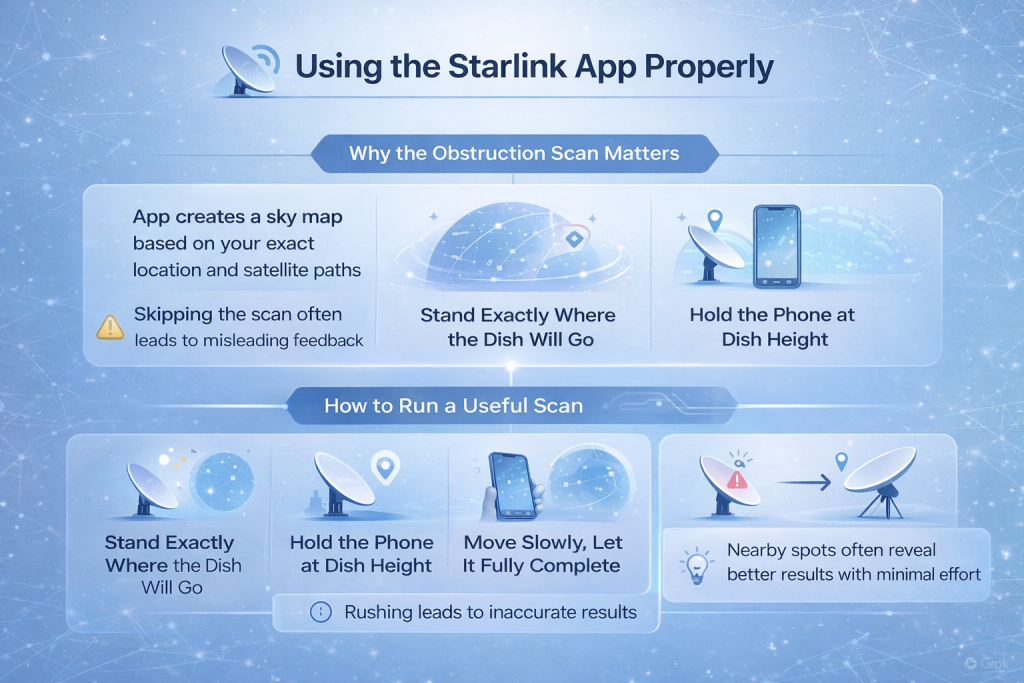
Using the Starlink App Properly
Why the Obstruction Scan Matters
The Starlink app creates a sky map using your exact location and the paths satellites follow over time. It is not making assumptions and it is not being overly cautious. When you skip the obstruction scan, you are usually relying on what looks clear to the eye instead of what the system actually needs to stay connected.
How to Run a Useful Scan
To get accurate results, the scan needs to be done carefully. Stand in the exact spot where the dish is likely to be installed and hold your phone at roughly the same height as the dish itself. Move slowly and follow the guidance shown on the screen, allowing the app to capture the full view of the sky. Let the scan complete fully before judging the result. Rushing this step often leads to misleading feedback that causes problems later.
What to Do if the App Shows Obstructions
If the app reports obstructions, it does not mean you are out of options. Rather than ignoring the warning or abandoning the location, try making small adjustments. Moving the dish a few feet or scanning again from a slightly higher position can change the result more than expected. Comparing scans from nearby spots often reveals a location that works far better with minimal extra effort.
Locations That Hold Up Over Time
Spots That Usually Work Well
- open ground with wide sky exposure
- rooftops above surrounding trees
- poles or masts away from buildings
These locations tend to stay reliable as seasons change.
Spots That Cause Problems Later
- balconies with limited sky access
- yards surrounded by trees
- roof edges that block part of the sky
They may work at first, then slowly degrade.
Power Is More Important Than It Looks
Starlink does not need special power, but it does need stable power.
Common power sources include:
- standard wall outlets
- vehicle electrical systems
- portable power stations
- solar setups with batteries
Unstable power causes reboots that often look like network problems. If performance feels inconsistent, power should always be part of the troubleshooting.
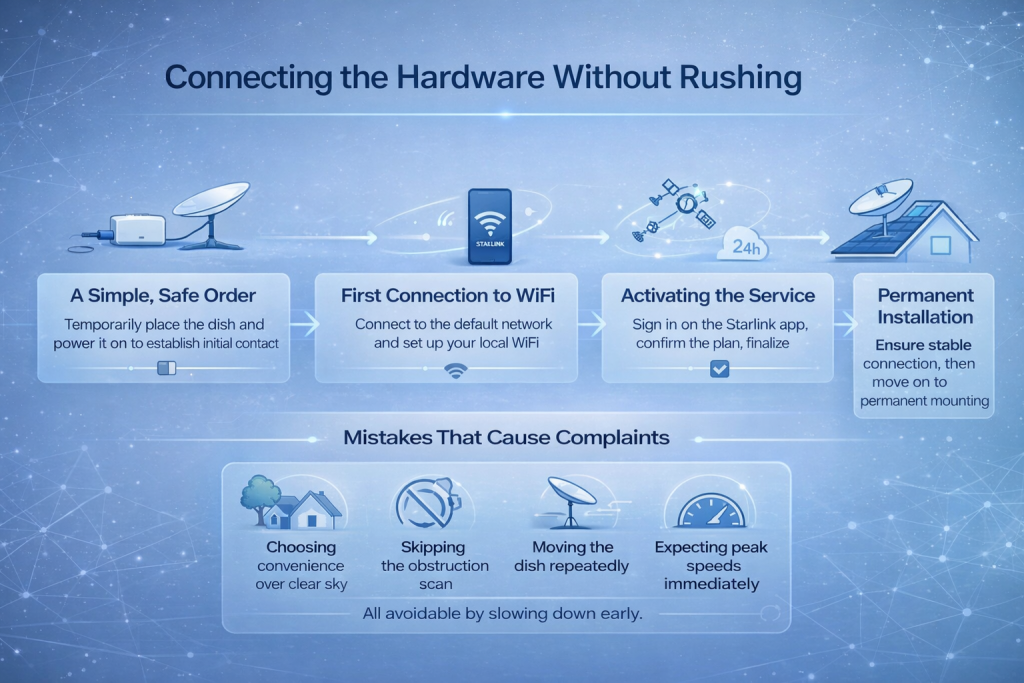
Connecting the Hardware Without Rushing
A Simple, Safe Order
Start by placing the dish temporarily in the spot you have chosen, without mounting it permanently. Connect the dish cable to the router or the combined unit, then plug in the power and allow the system to boot. At this stage, there is no need to drill or secure anything in place yet. Testing first helps avoid unnecessary rework. Once powered on, the dish may begin to move or change its angle as it searches for satellites. This behavior is normal and should not be interfered with or adjusted manually.
First Connection to WiFi
After startup, Starlink begins broadcasting a default WiFi network. Connect your device to this network and open the Starlink app. From there, you can set a custom network name and password. Once this step is complete, your local network becomes active and secured, allowing your devices to connect normally.
Activating the Service
Service activation takes place through the Starlink app using your account. During this process, you will either sign in or create an account, link the dish to your service, confirm your selected plan, and complete the remaining network setup steps. It is important to remember that seeing an online status does not mean the system has finished configuring itself.
What to Expect During the First 24 Hours
The first day often surprises new users. During this time, Starlink continues working in the background by downloading firmware updates, analyzing satellite paths, and optimizing handoffs between satellites. Because of this ongoing adjustment, you may notice fluctuating speeds, short interruptions, or changes in latency. This behavior is normal, and making constant adjustments during this period often leads to more instability rather than improvement.
When to Make the Installation Permanent
Once the connection has remained stable for several hours or a full day, you can move on to permanent mounting. Depending on your setup, this may involve ground mounts, roof installations, poles or masts, or mobile mounting solutions. When installing permanently, it is important to consider wind resistance, cable protection, and proper weather sealing where cables enter structures. Careful cable routing at this stage helps prevent many long-term issues later on.
Alignment: What You Should and Should Not Do
Starlink does not require manual aiming.
Depending on the model:
- the dish aligns itself automatically
- or the app suggests a general orientation
If the app says alignment is good, trust it. Manual adjustments usually create more problems than they solve.
Mistakes That Cause Most Complaints
These show up again and again:
- Choosing convenience over clear sky
- Skipping the obstruction scan
- Moving the dish repeatedly
- Expecting peak speeds immediately
All of them are avoidable by slowing down early.
Using an External Router or Mesh System
For many homes, the built-in Starlink router provides enough coverage on its own. In larger spaces, however, additional networking equipment can make a real difference. Large houses, office environments, or layouts that require mesh WiFi often benefit from using an external router or a mesh system. Starlink supports these setups, but the way everything is configured matters. A proper network setup helps avoid conflicts and ensures the connection stays stable across all devices.
When Something Goes Wrong
If something is not working as expected, the Starlink app should be your first point of reference. It clearly shows the current system state, whether the system is booting, searching for satellites, offline, or experiencing router connection issues. Checking these messages before guessing or resetting hardware saves time and usually points directly to the source of the problem.
Light Maintenance That Pays Off
Starlink does not need much attention, but it helps to:
- check for new obstructions occasionally
- inspect cables after storms
- monitor app alerts
Updates install automatically and often improve stability.
Conclusion
Setting up Starlink is less about technical skill and more about making a few thoughtful decisions early on. Where you place the dish, how stable your power source is, and whether you give the system time to settle all have a bigger impact than most people expect. When those basics are handled well, Starlink usually fades into the background and just does its job.
The biggest mistake is treating setup as something to rush through. Starlink is designed to be user-installed, but it still follows clear physical rules. Clear sky matters. Stable power matters. Patience during the first day matters. If you respect those limits, the system tends to reward you with a reliable connection, even in places where traditional internet options fall apart. Done right, setup becomes a one-time effort rather than an ongoing problem to manage.
FAQ
No. Starlink dishes are built to align themselves automatically once powered on. Depending on the model, the app may guide initial positioning, but fine adjustments are handled by the dish itself. Trying to manually aim or force the angle usually causes more issues than it solves.
Basic connectivity often appears within minutes, but full stability takes longer. During the first several hours, and sometimes the first day, the system downloads updates and optimizes satellite handoffs. Some speed fluctuations or brief interruptions during this period are normal.
Even partial obstructions can affect performance. Starlink does not need a single clear direction, it needs a wide view of the sky. Trees, roof edges, or nearby structures can cause short but repeated dropouts over time. The obstruction scan in the app is the best way to understand how serious those obstacles are.
You can, but it should be done carefully. Moving the dish resets part of the optimization process, so it is best to avoid frequent repositioning. If you do move it, give the system time to re-adjust before judging performance.
Yes. Unstable power is a common and overlooked source of problems. Voltage drops or unreliable inverters can cause the system to reboot, which often looks like a network issue. A steady power source usually solves these problems quickly.
For many setups, no. The built-in router works well for small to medium spaces. Larger homes or offices may benefit from external routers or mesh systems, but those are optional upgrades, not requirements for initial setup.
Start with the Starlink app. It shows clear status messages like booting, searching, or offline, which point directly to the cause. Guessing or resetting hardware without checking the app often leads to unnecessary frustration.